Another great crafty idea from CRAFTzine – DIY mini journals. I can see these as menus, programs, guest books, even invitations!
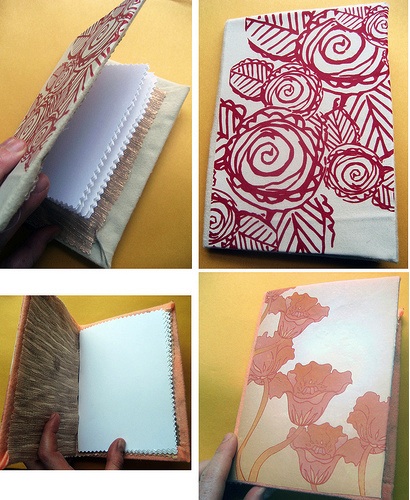
Samantha Hahn via CRAFT
Another great crafty idea from CRAFTzine – DIY mini journals. I can see these as menus, programs, guest books, even invitations!
Samantha Hahn via CRAFT
It’s been a busy week. I got my dream job offer, flew to DC, found an apartment, and have packed 7 fridge-sized boxes since yesterday in preparation for my big move to DC this weekend. Although this means my fiance and I will continue our long-distance relationship for another 6 months or so before we re-evaluate our next move, NYC (where he lives) is a lot closer to DC than Africa was (where I was living last year).
Yesterday was my birthday and after a long search, I finally found and purchased a Gocco as my birthday gift to myself. I’ve basically been on the fence about purchasing a Gocco for a year at this point and naturally, by the time I realized just how much I wanted one they were completely sold out basically everywhere. Oops! Oh well, after some sleuthing and a shout out on my blog and some great tips from my readers, I found one and it is supposed to ship today. Hooray! So in the spirit of all things Gocco, I thought I’d share some of my favorite Gocco inspiration.
Throughout the planning process, I mentioned before that I wanted to stay sane and delegate where I could. Â That included finding a florist who I trusted to do just about whatever she wanted, letting my parents be in charge of the catering and the alcohol, and letting my bridesmaids choose much of their own outfits. Â However there was one thing I couldn’t let go of – I wanted to make the invitations and other stationery myself. Â Naturally, that began with Save the Dates.
One of our favorite vendors and Library Members is Kimberly from Papeterie. The Papeterie line of offset and letterpress printed invitations is adorable, and Kimberly is so creative!
I wanted to share my wedding invitations as an example of the stationary I handcrafted for our wedding. Unfortunately, I don’t have any invitations left, or even a picture. I spend dozens (and dozens!) of hours silkscreening my invitations, and I don’t even have one picture of all that work. This is why it is crucial to drastically overestimate the number of invitations you may need, if your family is as wishy-washy and uncommitted as that of my husband. Our limiting factor for our wedding was the space – our ceremony room held 180 individuals, maximum. Due to that constraint, we had an A list, and unfortunately, also had to have a B list. I had counted the number of invites I would need if we went through every single person on the A list and on the B list… and added 40, “just in case.”
After successfully completing our wedding invitations, I knew that I could do the remainder of the wedding stationery myself. I designed, printed, and assembled the rest of our wedding stationery using the same process as I did with our invitations. I created ceremony programs, menus, escort cards, place cards, table signs, table numbers, stickers, out of town boxes, and our rehearsal dinner invitations.
Our next entry is from Wanwisa, who submitted her beautiful poster-style wedding programs!
One area where we decided we could save money was in all of the print materials. I had a pretty specific idea of how I wanted the final invitations to look and knew we could create a simple look on our own.
At six weeks to go until our wedding, we are starting to really think about and plan all the little details like hotel and map enclosures for our invitations, small ceremony details, escort cards, and programs. I would like to have some sort of program for the ceremony, but I a) don’t want it to cost a lot and b) don’t want it to be too complicated. An idea that I had was to find an interesting printed paper, and use that for the programs and accent on the escort cards. Originally, I had wanted something that incorporated both the navy blue (even if it was just touches of it) and the terracotta/orange color, but that wasn’t too Asian influenced. This was much harder than I expected, so if any of you have great sources for paper with printed designs, feel free to share!! But, while browsing at my local JoAnn fabrics store, I came across this paper which I thought was really pretty, incorporated the creams and golds we are using, and had a nice saying about the memories we make and keep throughout our lives.
I’m a big fan of the Food Network and enjoy watching “Semi-Home Made Cooking with Sandra Lee” where her “philosophy combines 70% ready-made products with 30% fresh.” Since I’m not very crafty I applied her motto toward my wedding projects since I knew I couldn’t do it all from scratch. Below are a few of my Semi-DIY projects that I tackled.
As I previously posted, our invitations went out last month and we have been receiving a steady stream of RSVP cards. As I was going through the pictures of the assembly process, it makes it look easy. Trust me, it was very intense and not the easiest invitations I have put together! (This is my fifth set of invites designing and assembling) If only I had pictures of the week long prepwork before this day (and yes, it was the entire day!). In the week or so before finishing the invites, my mom stamped the wax seals, I cut and folded strips of paper, printed all the items, struggled with the printer and getting letterpress paper to go through it (I just loved the texture of that paper though!) and mounting the invite to the blue shimmer paper and then to the gold enclosures. Oh yes, and then remounting everything with super glue to be sure it would stay. I think there was something about the dry Arizona air that made the photo mounting squares not work so well this go-around.
Our invitations are officially out and RSVPs have already started coming in! My mom, bridesmaid Julie, and I created the whole thing by ourselves so it was definitely a labor of love. Here’s a look at the final package!
Designing my own invitations was undoubtedly the most daunting and time-consuming DIY activity thus far.  Prior to assuming the responsibility myself, I perused hundreds of invitation templates, online and in-person, searching for the following criteria: simple, concise, personal, one-page (green), my colors (kraft-paper-brown and silver), travel-themed, rich, and affordable.  During that time, I found a lot of what I was looking for–but not in the same invitation suite.  So I saved all my inspiration; internally dug up the knowledge I learned at a 2-day Photoshop training two years ago; and spent four months analyzing, agonizing and eventually, designing my own invitations. That being said, seeing them printed and sent is so satisfying, I would do it again in a heartbeat.
The weeks leading up to your wedding are impossibly busy. I was pretty organized throughout the process but between designing our programs, creating menu cards and printing escort cards, free time was hard to come by the last few weeks. Oh and don’t forget about making sure all gifts were purchased and cards written. And that there was a detailed timeline of the day. Or, if you’re us, a detailed timeline of the 5-day event starting Wednesday.  Regardless, doing these projects myself made our wedding a labor of love and I enjoyed pouring myself into every last detail.
After the church and reception venue were booked and the date was set, it was time to think about our Save the Dates. Matt and I were talking one night and decided that we wanted to create a map chronicling the paths we each took to find each other and where we are now. We both went off to college, moved across the country after graduation, and met as two midwestern kids in NYC before getting engaged and moving to Memphis. And now we were planning a wedding in Louisville. Whew. It wears me out to just write it. I mentioned our idea on Pretty Bride and soon Laura Hooper came to the rescue.
Kathy at Merriment Design has outdone herself again! I adore these fabric-backed invitations with half sewn fabric flowers. My favorite part is the creative use of patterned fabric to create several unique designs with the same components.
In November EAD held a DIY contest, and E. encouraged me to enter my invitations, still in progress. Oh sure, I said, If I finish them soon! E., I totally did not finish them soon. Ladies- (And gentlemen? If you include DJ and one brother) I finished printing the maps on July 17, the night before we mailed them. Expert procrastinator. Hey E., can I enter now??
Our guests will find a lovely treat in their mailboxes this week — our invitations! Finally! I never thought the day would come. Here’s a look at the complete suite, a.k.a. our pride and joy:
I get lots of font-related questions over at Oh So Beautiful Paper, so this week I thought I’d focus on a few of my favorite fonts – specifically calligraphy and script fonts! I’ve also got a few suggestions for serif and alternative fonts (like wood type and slab fonts), but will share those in a future post.