Leaves are falling, pumpkins are out and apple cider is calling our name! That’s right, fall is in full swing and at Elizabeth Anne Designs, we couldn’t be more excited to celebrate the season. To help us bring the beauty of fall indoors, we have an amazing DIY floral arrangement from one of our newest Vendor Guide members, Blooms by the Box. Blooms by the Box is an amazing resource for those wishing to create their own wedding floral arrangements. They have a wide variety of quality flowers that you can order wholesale, as well as all the tools, vases and containers you could ever need! Their expert advice and tutorials like the one below make bringing your floral dreams to life a snap.
This DIY is perfect for fall wedding festivities or as a seasonal centerpiece for your kitchen table. Follow the instructions below to create your own mum masterpiece!

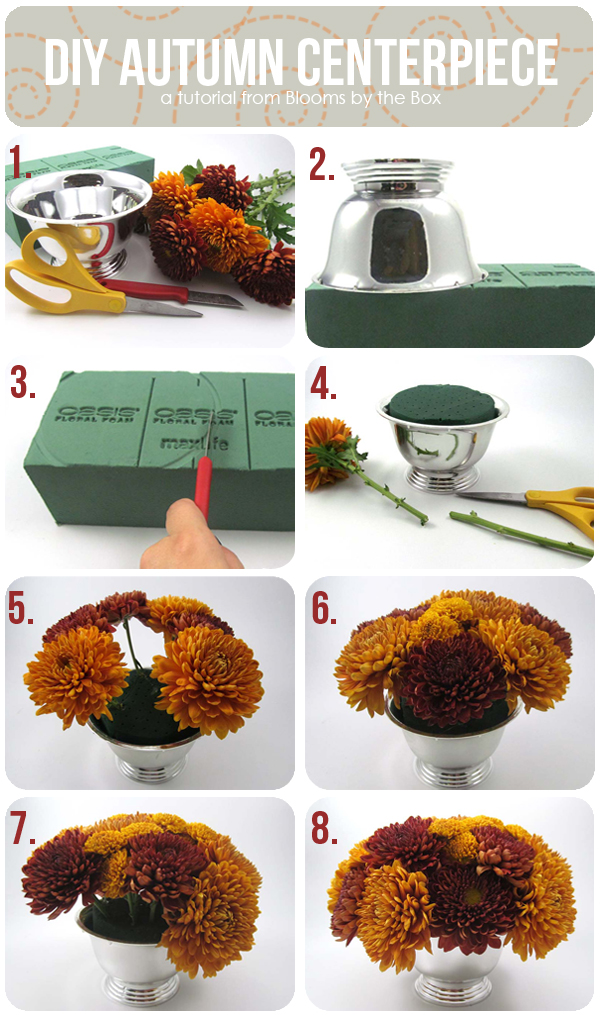
1. Purchase your supplies from Blooms by the Box! For this arrangement you will need bronze and red cremon mums, a 6 inch wide silver plastic revere bowl, floral scissors, a floral knife and one block of oasis floral foam.
2. Make an impression at the top of the floral foam by pressing the container down into the foam.
3. Now that you can see the impression of the container, use your floral knife to cut the foam to fit inside your container. When you are done, soak the foam in water for about 30 seconds. Do not push the floral foam down under the water; let it float in a bowl until there are no more bubbles. Then, push the wet foam into the revere bowl.
4. Cut down the stems of each mum as you go through the process. (Optional: Use floral adhesive on the bottom of the stems to ensure that the flowers stay put once inserted into the floral foam. Floral adhesive is waterproof so it will hold in the wet foam.)
5. Start creating a round shape using your fall colored bulk flowers. Placing the flowers in a radial shape as shown creates an outline for your round arrangement.
6. Fill in the center with flowers.
7. After the top and center are full, start inserting the flowers around the rim of the container. Fill in all the spaces to make a round and full shape.
8. Step back and admire your lovely autumn arrangement!
*This post was sponsored by Blooms by the Box


