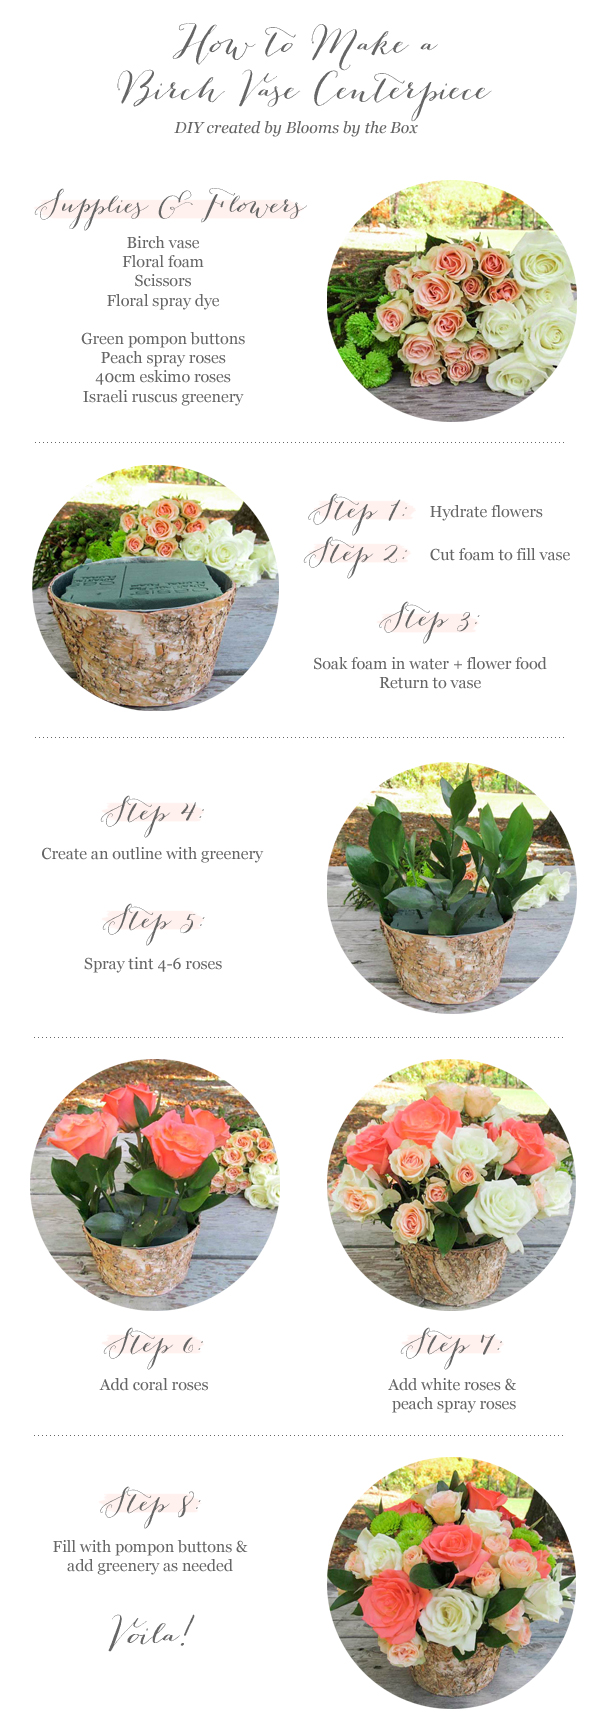
Thinking about DIY wedding flowers? You aren’t alone! Do-it-yourself arrangements can be both budget-friendly and beautiful! Today, we’re featuring a DIY centerpiece created by BloomsByTheBox.com that proves that vase selection and a bit of floral dye can create expensive-looking arrangements on a tight budget.

Supplies:
- One block of floral foam (one block makes two arrangements)
- Floral scissors
- Floral spray dye – we used Design Master Floral Spray
- Vase – we have selected an affordable moderately sized birch vase with a zinc liner
Flowers:
The flowers we selected include green pompon buttons, peach spray roses, 40cm eskimo roses, and Israeli ruscus greenery. You will also need floral spray dye, we used Design Master Floral Spray. The coral color introduces bright/ punchy color to the pale tones of the natural flower colors.
How-To:
- Hydrate the flowers before beginning to make arrangements. Cut the stems, using your floral scissors, under warm running water on a 45 degree angle. Make sure to cut off at least 1-2 inches from the stems. Allow the flowers to re-hydrate for 6-12 hours. Then, place the flowers in warm water (flower food optional) and store them in room temperature area out of direct sunlight or any hot/cold draft.
- Once your flowers are hydrated, use a knife to cut down the floral foam so it fits your vase. After the foam is cut, soak the foam in water mixed with flower food. Simply, drop the foam into the water. Do not push the foam under the water. The foam will sink.
- Once it is fully submerged and no longer releases water bubbles you can remove the foam and return it to your vase.
- Create a basic outline for the shape of your arrangement with Israeli Ruscus greenery. This greenery, in particular, is perfect for creating basic arrangement shapes due to its sturdy vertical shape.
- Next, spray tint 4-6 roses. See a live tutorial!
- Once the paint has dried, start by adding the coral roses. The color will not rub off onto other flowers once it is dry, which only takes 1-2 minutes. Despite common beliefs, the floral spray will not affect the vase life of the roses.
- Add the white roses and peach spray roses to fill in the space and create a consistent arrangement shape.
- Add the final touches of filler and greenery. The pompon buttons and greens create a finished and polished look.
This DIY centerpiece took about 10 minutes to make. With the helping hand of a few friends, you can make 30 arrangements in about 2 hours! Create the arrangements the day before the wedding to make sure all the flowers are in peak condition. Arranging a day in advance will also help you avoid any wedding day stress. The arrangements will stay fresh for days, and can also double as a gift for guests.
Giveaway Alert!
BloomsByTheBox is hosting a giveaway! One lucky winner will receive:
- $150 of BloomsByTheBox Flowers
- 10 birch bark vases
- 1 Floral Design Master Spray
Visit BloomsByTheBox.com for all of the details!
*This post was sponsored by BloomsByTheBox.com, the online wholesale flower resource that will help you with your DIY flower experience from start to finish. If you are looking for a DIY flower vendor, visit BloomsByTheBox.com to get in touch or see all of our useful tutorials and DIY Guide to Wedding Flowers!


